
If you’ve been blogging for a while, you know that adding images to your blog posts can be a great way to drive traffic to your blog. Photos make your blog posts colorful and eye-catching, aid in how-to guides, and give your readers a clear picture of what you’re writing about. No matter what you’re blogging about, images can add a lot of depth to your posts – after all, a picture is worth a thousand words. What you may not know is that there is more to adding images to your blog posts than just choosing the most aesthetically pleasing photos. The file size of the image you upload can literally make or break your website.
We’re not talking about simply shrinking the image or using the crop feature, but actually changing the image’s digital file size. Decreasing the file size of the image allows it to take up less server space and load faster, which will help keep readers on your page by holding their attention. Server space and speed affect your bottom line (read on to learn why). For internet viewing, you do not need to have high resolution images that you would want for print, therefore reducing both the actual dimensions of the image as well as the quality of image can help reduce your file size and have big benefits.
Luckily, you do not need any advanced knowledge of coding to resize your images. In this step-by-step how-to guide, we will tell you what you need to know to successfully resize images for your WordPress site, and help you take your blog to the next level!
Why Resize Images for WordPress
WordPress Server Space: Saving Money Makes Sense
The first reason to resize your images is to conserve server space. Server space is the storage space on a server where your website is hosted (in the case of our example, WordPress) that you purchase for a fee. Server space is not cheap and you pay for it each month of the life of your website, so reducing the amount of server space used is important for keeping your long-term overhead costs down. When you decrease the file size of an image – not just simply cropping the image (which reduces image size but not necessarily digital file size) – you decrease the amount of server space you use.
WordPress Loading Time: SEO and Visitor Bounce
Another reason you will want to resize your images is the amount of time it takes for larger image files to load. Consumers have a short attention span, and the extra few moments it takes for a large image to load might be enough time to make your readers scroll on by or leave your site altogether. On average 30% of users will bounce off a webpage that takes more than 3 seconds to load.
Slow load time also affects the Search Engine Optimization (SEO) value of your post – SEO is how well your post shows up in search. Slow-loading websites perform poorly in Google searches. Users are turned off by slow loading websites, and having too many large photo files on your blog can actually slow down your website altogether. Simply put, decreasing your image files down to an appropriate size will keep both your readers and the Google algorithm satisfied.
WordPress Efficiency: Keeping Your Site Lean and Mean
Finally, large photo files can eventually bog down a website and cause it to break. Keeping your WordPress website lean and mean is important for overall performance and avoiding issues that can arise in the long term. Remember, WordPress websites are dynamic websites and have many moving parts. They are not static pages that require little to no maintenance or upkeep. You want to do everything you can to keep the website running efficiently and this includes not bogging the website down with big image files.
How to Resize Images for WordPress Websites
Now that you know why you need to resize images for your WordPress site, let’s dive into a step-by-step guide to show you how to do this. First you will need a photo editing software. There are many options to choose from, but our favorite is Pixlr.com because it is free and easy-to-use. We will be using Pixlr to guide you in resizing images for WordPress will be using, but the process will be similar with most photo editing software you choose to use.
To start, you will need to know the goal of resizing your images. Your goal is to decrease the file size of your image to around 100 kilobytes (KB), and you can do so by decreasing the dimensions to 1000 pixels in width or less and then if necessary saving the image at a lower quality.
Steps To Resize An Image For WordPress Websites:
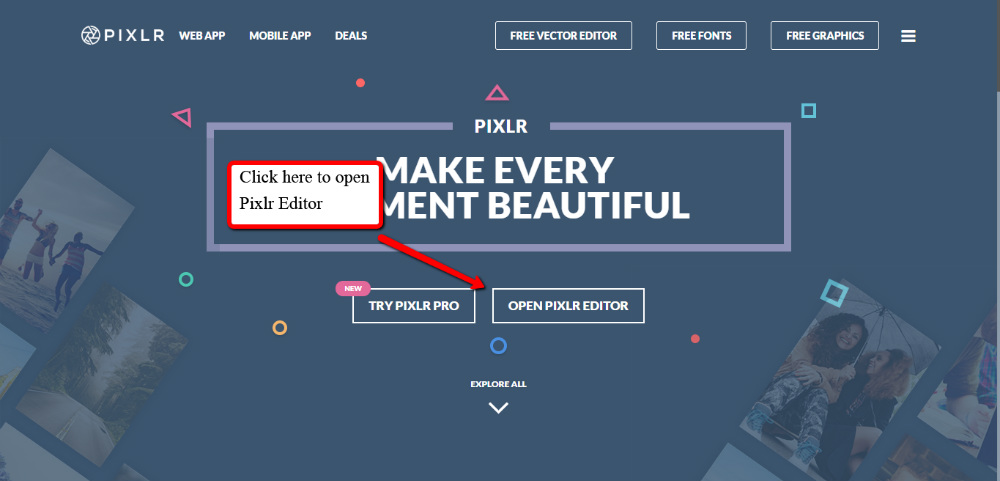
- Go to Pixlr.com.
- Click “Open Pixlr editor.”

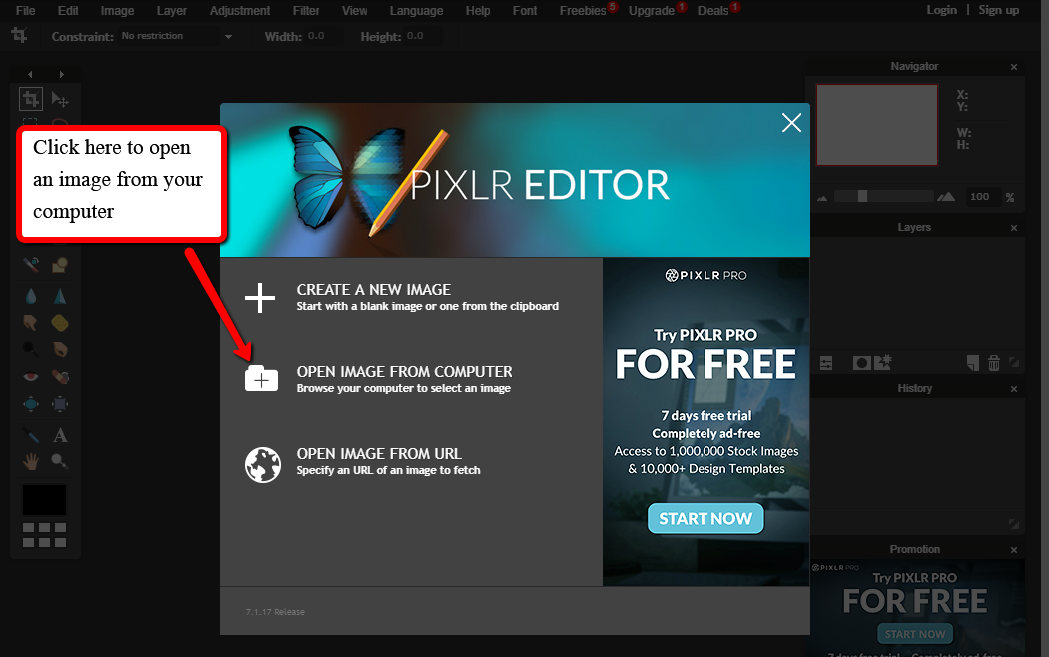
- Click “Open Image from Computer” to browse your computer for the image you want to edit. Select the image you want to open.

- Once you have the image opened in Pixlr that you want to edit, select “Image” from the edit menu – the main navigation bar at the top of the screen.

- From the “Image” dropdown, select “Image size.”
 A pop up box will appear with both the width and the height of the image in pixels, which you can then adjust. Start by decreasing the width to 1000 pixels (for blog posts and website uploads 1000 pixels should be more than enough). Make sure to check the box labeled “Constrain proportions,” and the height of the image will automatically adjust when you change the width, so the proportions of the image remain the same. Then click “OK.”
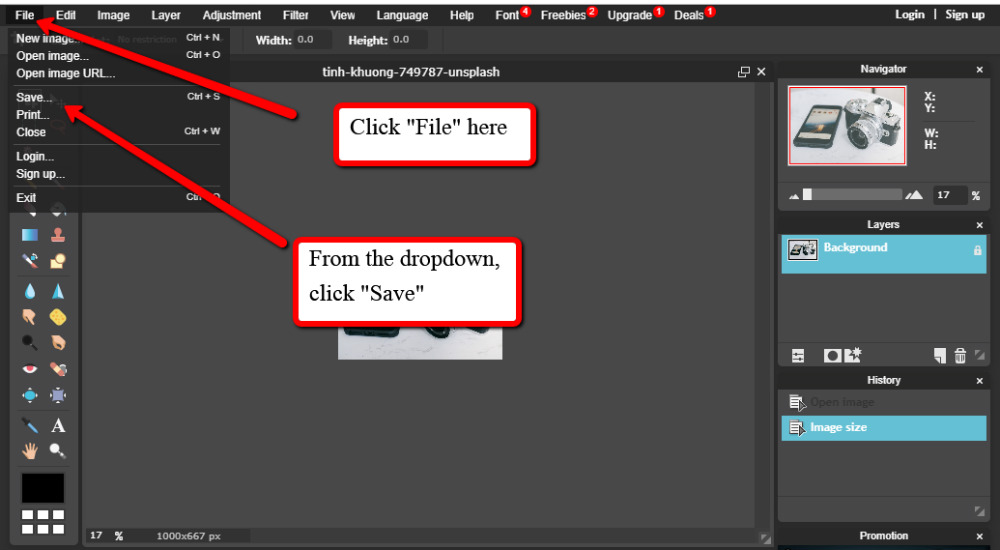
- Next, click “File” from the edit menu and from the dropdown select “save.”
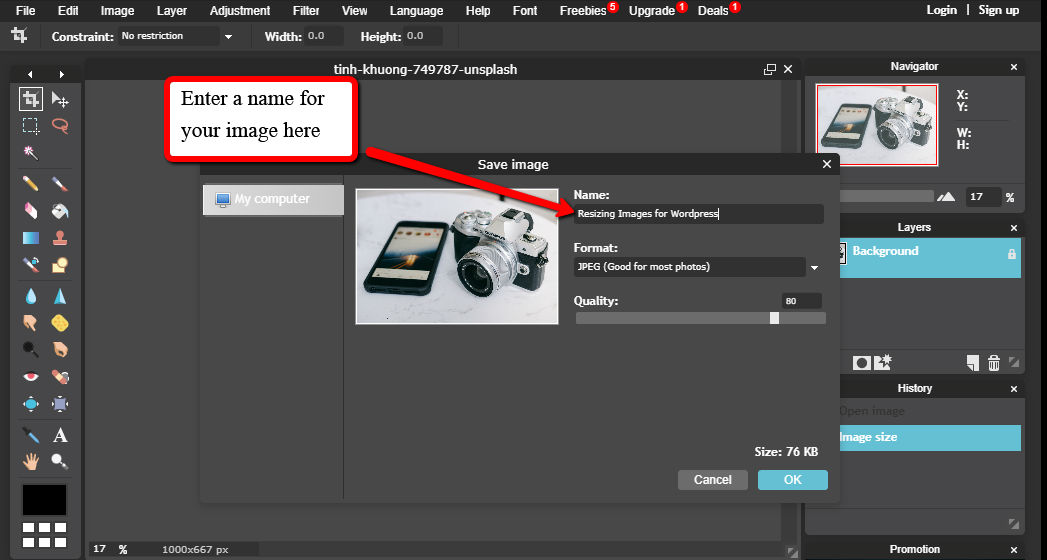
- The save screen will have a line labeled “Name” where you can enter a custom name for the image. You want to name your image with SEO in mind. Use the keyword phrase for the blog post you are adding this image to.

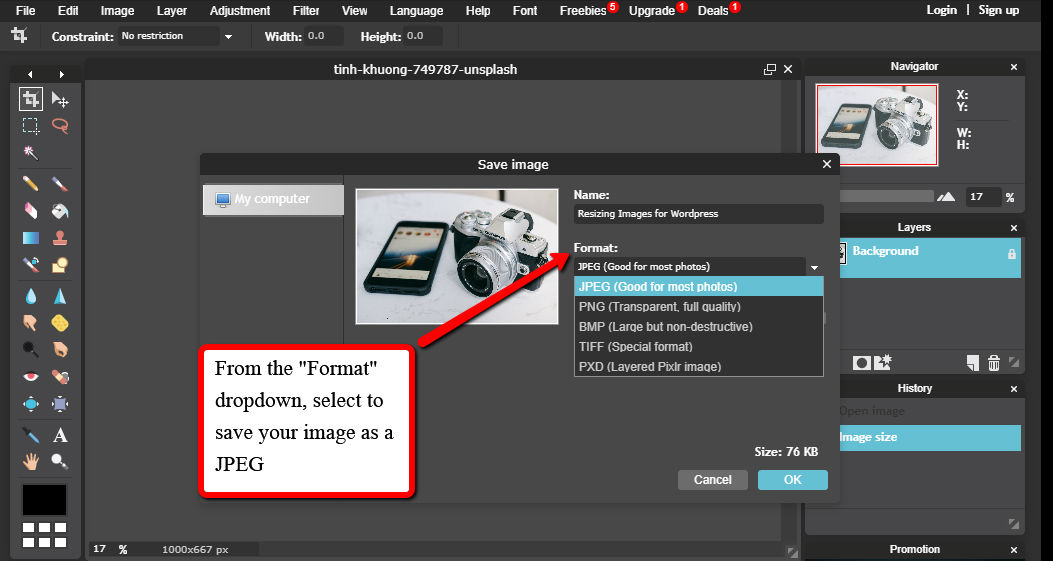
- Under the name, there will be a dropdown labeled “Format.” Click this dropdown and you will see the options for the image format (JPEG, PNG, BMP, TIFF, PXD). Select to save it as a JPEG file. JPEG files work well online, and will also allow you to adjust the quality of the image.

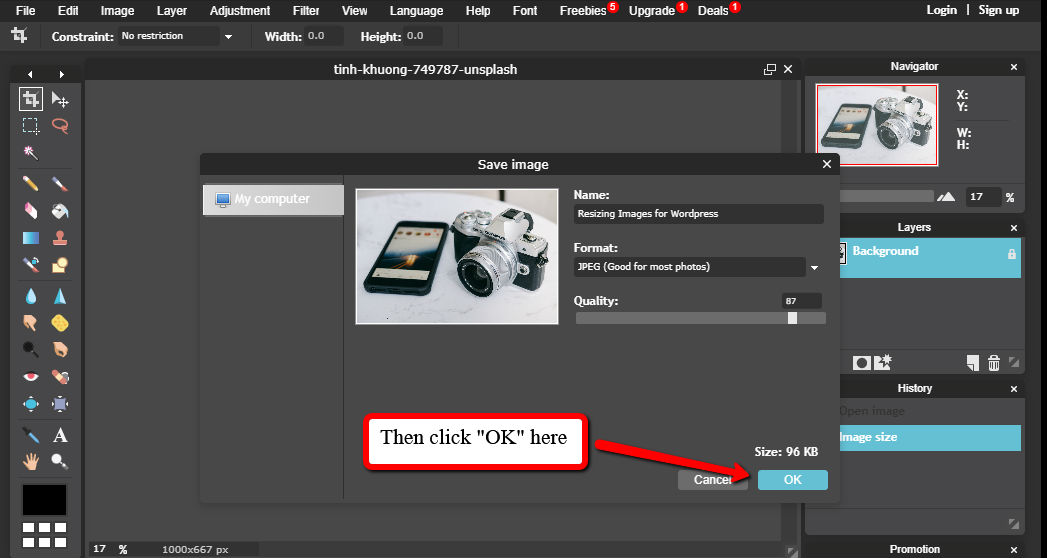
- There will be a handy bar indicating quality underneath the “Format” dropdown. At the bottom of the save screen, the image size in KB will be displayed. If your image size is not around 100 KB, you can further decrease the size to be around 100KB by reducing the image’s quality.Drag the “Quality” bar to increase or decrease the quality. As you drag it, you will see the KB image file size adjusting with the quality. Slowly lower the quality until you reach the approximate 100 KB goal.

- To save the image, click “OK” at the bottom of the save screen.

- You now have the option to save the image to any location on your computer. Select the location where you want the image, and you will also have the option to change the name and format again – but that has already been taken care of in the previous step, so you can leave this as is. Then save the image, and you’ll have it ready to use when you need it!



Now that you have a JPEG image that is resized and named correctly, you are ready to upload it to your WordPress blog post! Login to your WordPress site, go to the post where you will add the image, and upload it to your media file. Double check at this point that the image name is correct, that the dimensions are correct (1000 pixels at width or less), and that the file size is beneath 100 KB. If so, you are good to go! You now have an image that will aid your blog post in SEO, keep your readers’ attention, and make your post colorful and interesting!
Resizing images is an important part of keeping your blog running smoothly and quickly and keeping a captive audience. We hope this how-to guide will be helpful to you as you create awesome content for your website!
In the meantime, if you need some extra social media guidance, sign up for our free updates and feel free to contact us with questions so we can help you maximize your business presence online.